A gigapan

Monday, October 25, 2010

A DIY Microtome

"microtome (from the Greek mikros, meaning "small", and temnein, meaning "to cut") is a sectioning instrument that allows for the cutting of extremely thin slices of material, known as sections." (from Wikipedia)


They also cost actual cash money...from an economical $69.75 for this 'Hand Microtome' from The Science Company.  Which says that one turn of the base will create a 0.5mm section, and is calibrated to create 10 micron sections, so 1/50th of a turn = 10 microns, a full turn = 500 microns or .5 mm.


Or you can spend $12,445 for a unit which can create,  a 0.5 micron section.


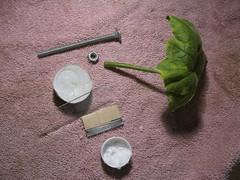
But building from the DIY philosophy, you can build a pretty nifty Microtome with with a bit of wax a 1/4" - 20 nut and bolt, and a razor blade!  With all credit, like many good DIY ideas, this one comes from an older book.  See below for details...
The parts for a homemade Microtome


Read on to learn how!

Monday, October 18, 2010

Microgigapan Adapter Kit - update on 'everything.'

Here is the current status on the MicroGigapan Adapter Kit, listed in priorty order, with my plans for the next steps.

We are meeting at Ames on Thursday.  I have requested a visitors badge for Gene from Ted.

Current Status on the MicroGigapan Adapter Kit: I am planning to have a test image out today, Monday the 18th.  And then take more tests.

  • Computers to run process: We've had trouble getting laptops ordered.  Need to figure that out.  I (Rich) have loan of Gene's old Window's laptop, so I have enough to be able to get software worked out a bit.
  • Mechanics/Electronics: with Gene's help I have all three stepper motors and the camera responding to his software.  I have a little bit of work to screw things back together.
  • Software: I am able to run Gene's software from my Mac, and from his Windows machine.
  • Lighting: I made a box to raise the microscope so that a flash can fit underneath and be projected up through the regular microscope optical path.  My flash does not have adjustable power, so I am adjusting the intensity by experimenting with filters between the flash and the microscope (by 'filters' right now I am using opaque acyrilic, and sheets of paper).  I am triggering the flash with a wireless trigger I have.  Bonus: with some foam the box doubles as a protective case for transporting the microscope.
  • Optics/image quality: I believe that taking out the intermediate 2.5x lens and lowering the camera has made a definite improvement.  But it is hard to test because focusing is hard!  After the rig is up I am going to take single frame-multi focus images of our test samples, focus stack them, and then see how they compare.  I also need to experiment with the distance from the camera to the microscope, which may require fabricating some adapters/repurposing things we have :-)   I have an adapter which goes from Canon to T-Mount.  There are lots of rings, adapters, tubes, bellows, extensions, etc with T-Mount threads.

Thursday, October 14, 2010

GDAL Utilities for Gigapan Processing

I've been using the 'Geodata Abstraction Library' utilities to process gigapan images. There is some philosophy here I could go off on, but I just want to capture some useful command lines.

The easiest way to get _lots_ of nifty spatial tools is to down load "FWTools: Open Source GIS Binary Kit for Windows and Linux"

GDAL includes useful command line tools for manipulating spatial data. And we can treat gigapans as spatial data.

Shrink a large image to 10% of its' original size:
gdal_translate -outsize 10% 10% infile.tif outfile.tif

RGBA Tiff images can be split into component parts.  This is an interesting effect:
gdal_translate -b 1  -of JPEG -outsize 10% 10% maia_hands.tif m_b1.jpg
gdal_translate -b 2  -of JPEG -outsize 10% 10% maia_hands.tif m_b2.jpg
gdal_translate -b 3  -of JPEG -outsize 10% 10% maia_hands.tif m_b3.jpg


Merge two bands, with output greyscaled:
gdal_translate -b 1 -b 2  -outsize 10% 10% maia_hands.tif m_b12.tif

Crop an image
gdal_translate -srcwin 3400 2700 12500 8500  maia_hands.tif m_subwin.tif
-srcwin xoffset yoffset xsize ysize
offset where the top left is 0,0.

Saturday, September 25, 2010

MakerBot arrives

We are using the Arduino GCode interpreter from the RepRap and MakerBot projects for the Macro and Micro rigs which we are automating (Jay's microscope already had serial control of the stage, so it did not need that control).

GCode is a semi-standard language for CNC (computer numerical control) machines.  It is normally generated by software, but it is 'pretty simple' to use for simple things.  For example, this code:
G00 X1.2 Y2.3 Z-1.0

Will move the X, Y, and Z axis of the tool.  You can also do interpolated movement, and control the speed the tool moves, spindle speeds, feed rates, etc, etc.

I ordered a Maker Bot, which is a robot which makes things.  It moves an object in XY and Z, and spreads melted ABS plasic on the part, in he places it is supposed to be.

This has three great applications for us.  First we can build parts with the MakeBoT; Second: we gain fluency and fluidity in the area of XY and Z control and Third: MakerBot XYZ control is more or less the same thing as we need for our Macro and micro rigs.

So the MakerBot arrived, and step one was to mix all of the parts together in order to capture a Gigapan!


Thursday, September 23, 2010

Map my shiny metal a**, the past becomes the future

In 2004 Schuyler Erle and wrote up an outline for O'Reilly Associates for a book on maps.  This became Mapping Hacks.  The project lead to definitely measurable and small amounts of fame and fortune, and allowed me to work with Schuyler and Jo Walsh.

We saw it as our mission to take our software/hacker/artist/malcontent sensibilities and go and explore the World of Conventional GIS and bring back dispatches from the intersection of what temporarily became called 'Neo' and 'Paleo' geography.

Here is a wordy bit of recollection in which I try to create a cohesive arc between some of my previous thinking about mapping and my current work on Gigapans.

Wednesday, September 15, 2010

Project Overview

We are developing tools to support the full work flow of capturing, processing, and presenting high resolution zoomable images of macro and smaller subjects.

Hardware
There are many existing instruments capable of image capture, from pocket cameras with a macro mode to manual optical microscopes, on to high end fully automated microscopes, and then to the upper ends with Scanning Electron Microscopes and more.

Some of these instruments have computer control of the microscope movement, which we can use to capture sets of images, other intruments are currently manual and we are creating kits and plans to let us automate capture.

Software and Workflow
The results from the image capture are a lot of images.  Sometimes a whole lot - thousands, even tens of thousands of images!  We are using and documenting multiple tools to help us automate the process of managing these images, and then stitching together 'focus stacks' of images, and then stitching together the resulting mosaic of focus stacked images.


Open Source
We are building on a rich tradition of work which other people have done, and we would be at a loss without that work!  So we are working to release as much as possible of our code and designs under open licenses so that other people can repeat and expand on our work.